Post Top Ad

Friday, December 28, 2018

December 28, 2018

Create virtual environments for python with conda

1. Check conda is installed and in your PATH


  1. Open a terminal client.
  2. Enter conda -V into the terminal command line and press enter.
  3. If conda is installed you should see somehting like the following.
$ conda -V
conda 3.7.0

2. Check conda is up to date

  1. In the terminal client enter
conda update conda
  1. Upadate any packages if necessary by typing y to proceed.

3. Create a virtual environment for your project

  1. In the terminal client enter the following where yourenvname is the name you want to call your environment, and replace x.x with the Python version you wish to use. (To see a list of available python versions first, type conda search "^python$" and press enter.)
conda create -n yourenvname python=x.x anaconda
  1. Press y to proceed. This will install the Python version and all the associated anaconda packaged libraries at “path_to_your_anaconda_location/anaconda/envs/yourenvname”

4. Activate your virtual environment.

  1. To activate or switch into your virtual environment, simply type the following where yourenvname is the name you gave to your environement at creation.
source activate yourenvname
  1. Activating a conda environment modifies the PATH and shell variables to point to the specific isolated Python set-up you created. The command prompt will change to indicate which conda environemnt you are currently in by prepending (yourenvname). To see a list of all your environments, use the command conda info -e.

5. Install additional Python packages to a virtual environment.

  1. To install additional packages only to your virtual environment, enter the following command where yourenvname is the name of your environemnt, and [package] is the name of the package you wish to install. Failure to specify “-n yourenvname” will install the package to the root Python installation.
conda install -n yourenvname [package]

6. Deactivate your virtual environment.

  1. To end a session in the current environment, enter the following. There is no need to specify the envname - which ever is currently active will be deactivated, and the PATH and shell variables will be returned to normal.
source deactivate

6. Delete a no longer needed virtual environment

  1. To delete a conda environment, enter the following, where yourenvname is the name of the environment you wish to delete.
conda remove -n yourenvname -all

Tuesday, December 11, 2018

December 11, 2018

The For Loop in Python

for loop is used for iterating over a sequence


Example : 

fruits = ["apple""banana""cherry"]
for in fruits:
  print(x)


Note: The for loop does not require an indexing variable to set beforehand.

Looping Through a String

for x in "banana":
  print(x)

The break Statement

Exit the loop when x is "apple":


fruits = ["orange""apple""cherry"]
for x in fruits:
  print(x) 
  if x == "apple":
    break


The continue Statement


With the continue statement we can stop the current iteration of the loop, and continue with the next:


fruits = ["orange""apple""cherry"]
for x in fruits:
  if x == "apple":
    continue
  print(x)


The range() Function

To loop through a set of code a specified number of times, we can use the range() function,
The range() function returns a sequence of numbers, starting from 0 by default, and increments by 1 (by default), and ends at a specified number.

for x in range(6):
  print(x)


Else in For Loop


The else keyword in a for loop specifies a block of code to be executed when the loop is finished:

Print all numbers from 0 to 5, and print a message when the loop has ended:

for x in range(6):
  print(x)
else:
  print("Finally finished!")

Nested Loops

A nested loop is a loop inside a loop.
The "inner loop" will be executed one time for each iteration of the "outer loop":


adj = ["red""big""tasty"]
fruits = ["apple""banana""cherry"]

for x in adj:
  for y in fruits:
    print(x, y)


Sunday, May 20, 2018

May 20, 2018

How to Check if a number is Odd or Even in Python 3

In this post, we will learn how to check whether a number entered by the user is even or odd.

You must have a basic knowledge of Operator and Control Statement in Python!


We also need to understand the meaning of the Odd and Even number So we can write a program easily.


A number is an even number if it can be divisible by 2 otherwise it's an odd number.


num = int(input("Enter a number: "))
if (num % 2) == 0:
   print("{0} is Even".format(num))
else:
   print("{0} is Odd".format(num))


Please Check. If you have any problem just send me an email : admin@khemputhea.com

Thursday, April 5, 2018

April 05, 2018

Facebook launches bulk app removal tool amidst privacy scandal

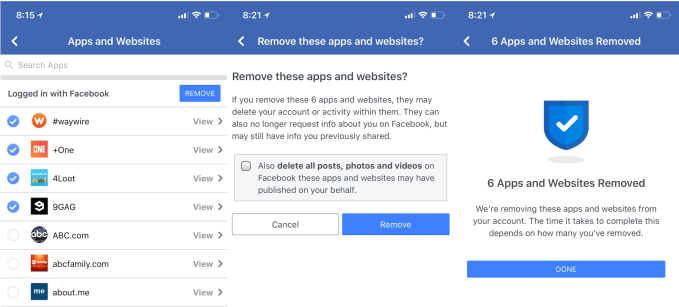
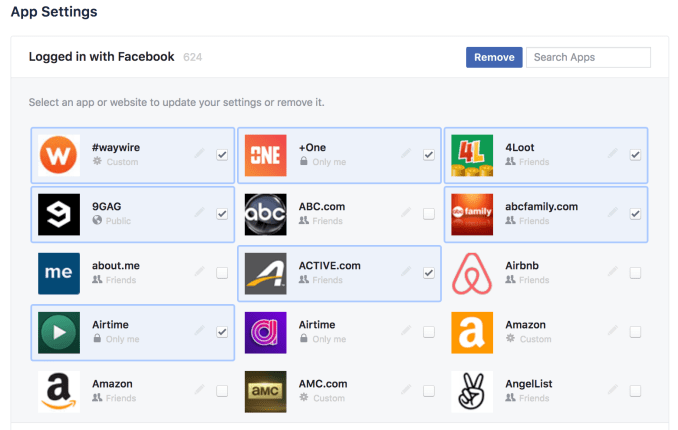
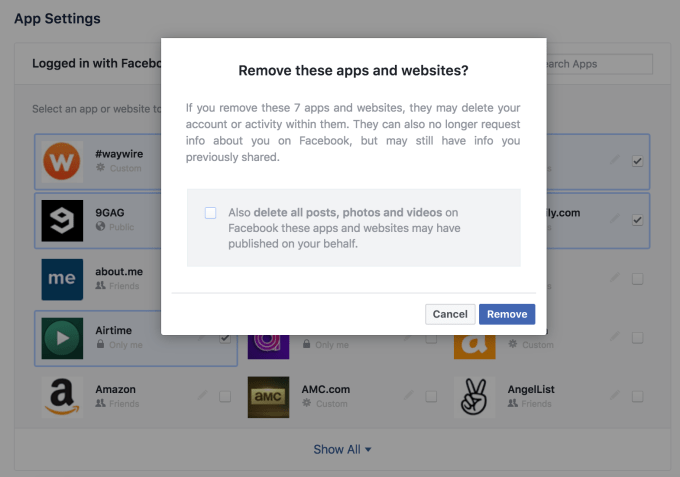
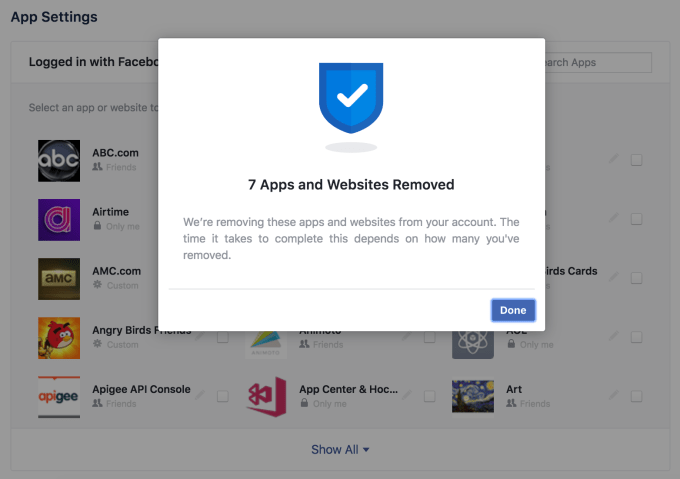
Following the Cambridge Analytica scandal, users have flocked to their Facebook  privacy settings to sever their connection to third-party apps that they no longer wanted to have access to their data. But deleting them all took forever because you had to remove them one by one. Now Facebook has released a new way to select as many apps as you want, then remove them in bulk. The feature has rolled out on mobile and desktop, and Facebook also offers the option to delete any posts those apps have made to your profile.
Facebook confirmed the launch to TechCrunch, pointing to its Newsroom andDeveloper News blog posts from the last few weeks that explained that “We already show people what apps their accounts are connected to and control what data they’ve permitted those apps to use. In the coming month, we’re going to make these choices more prominent and easier to manage.” Now we know what “easier” looks like. A Facebook spokesperson told us “we have more to do and will be sharing more when we can.” The updated interface was first spotted by Matt Navarra, who had previously called on Facebook to build a bulk removal option.
Facebook stopped short of offering a “select all” button so you have to tap each individually. That could prevent more innocent, respectful developers from getting caught up in the dragnet as users panic to prune their app connections. One developer told me they’d been inundated with requests from users to delete their data acquired through Facebook and add other login options, saying that the Cambridge Analytica scandal “really hurt consumer trust for all apps…even the good guys.” The developer chose to change its Terms of Service to make users more comfortable.
The bulk removal tool could make it much easier for users to take control of their data and protect their identity, though the damage to Facebook’s reputation is largely done. It’s staggering how many apps piggyback off of Facebook, and that we gave our data without much thought. But at least now it won’t take an hour to remove them all.


Friday, March 16, 2018

March 16, 2018

Indonesian President Joko Widodo wants Australia in ASEAN

Indonesian President Joko Widodo has sought to reassert his country's role as a regional leader saying he wants to join the Trans-Pacific Partnership and seal a free trade deal with Australia as well as closer defence and diplomatic ties.
Image result for jokowi australia

The president, who goes by the name Jokowi, said Australia should join the 10-member Association of South-East Asian Nations (ASEAN) and flagged that economic growth in Indonesia would accelerate once the first stage of his infrastructure program was complete.

Sunday, March 11, 2018

March 11, 2018

Machine Learning Crash Course from GOOGLE 100%

Google’s new ‘Machine Learning Crash Course’ is now available and it’s free for everyone. If robots are coming for your job this class will prepare you for your next one.
This same course has been taken by more than 18,000 Google engineers, and this is the first time it’s been made available to the general public. It’s part of the company’s ‘Learn With Google AI’ initiative.

According to Google it’s free because the world needs to understand AI:
We believe that the potential of machine learning is so vast that every technical person should learn machine learning fundamentals.
During the class students will watch lectures from Google researchers, participate in interactive visualizations, and complete 40 lessons. It takes about 15 hours and uses TensorFlow, Google’s open source machine learning platform.
Course prerequisites include a mastery of intro-level algebra concepts and at least an introductory understanding of basic programming. Knowledge of calculus and the ability to code in Python are helpful, according to the course’s website, but not necessary.
This is a fantastic way for anyone to get started in AI, and specifically TensorFlow. Students will learn about basic algorithms, classification models, and how neural nets work. Upon completion they should have the fundamentals needed to start working on basic projects and tutorials in the TensorFlow environment.
The class is available in English, French, Korean, Mandarin, and Spanish.
If you’re interested in taking Google’s free Machine Learning Crash Course you can get started here. For those who aren’t ready for the whole class there’s a variety of resources available at ‘Learning With Google AI‘, including specific tutorials and guides for every skill level.

Wednesday, February 28, 2018

Saturday, February 24, 2018

February 24, 2018

Real Madrid announce squad for La Liga match against Alaves

REAL MADRID’S SQUAD LIST:

Goalkeepers: Navas, Casilla and Luca.
Defenders: Carvajal, Varane, Nacho, Theo, Achraf and Tejero.
Midfielders: Casemiro, M. Llorente, Isco, Kovacic and Ceballos.
Attackers: Cristiano Ronaldo, Benzema, Bale, Lucas Vázquez and Mayoral.
Keylor Navas and Cristiano Ronaldo are back with the team while Sergio Ramos will get some rest. Marco Asensio will also miss the game after removing one of his wisdom tooth.
The BBC of Ronaldo, Benzema and Bale might be expected to start the game but the French striker could also come off the bench.
It will be interesting to see if Ceballos actually gets a chance to start the game after coming off the bench with just 28 seconds left in the match last Wednesday. Coach Zidane apologized to the midfielder and could try to find him some minutes against Alaves.

HOW TO WATCH, STREAM LA LIGA

Date: 2/24/2018
Time: 16:15 CET, 10:15pm EST, 07:15 am Pacific.
Venue: Santiago Bernabeu, Madrid, Spain.
Available Streaming: BeIN Sports (USA),Fubo.TV (EVERY Real Madrid game with a high-quality and legal stream, click here to sign up and benefit from a winter discount for new members and Managing Madrid readers).

Monday, January 29, 2018

January 29, 2018

Laravel 5.6 will Support the Argon2i Password Hashing Algorithm


Image result for laravel 5.6  new features

In 2013, cryptographers and security practitioners around the world came together to create an open Password Hashing Competition (PHC) with the goal of selecting one or more password hash functions to be recognized as a recommended standard.
On July 20th, 2015 Argon2 that was designed by Alex Biryukov, Daniel Dinu, and Dmitry Khovratovich from the University of Luxembourg was selected as the final PHC winner. Argon2 comes in the following three versions:
  • Argon2d maximizes resistance to GPU cracking attacks.
  • Argon2i is optimized to resist side-channel attacks. It accesses the memory array in a password independent order.
  • Argon2id is a hybrid version. It follows the Argon2i approach for the first pass over memory and the Argon2d approach for subsequent passes.
x
With the release of PHP 7.2 in November of 2017, PHP now includes functions for both the 2d and i version. However, the 2d is not suitable for password hashing.
Laravel 5.6 that is due out next month will now feature Argon2i password hashing support thanks to Michael Lundbøl, and you can find out how it’s implemented through the following pull request.
The old style of bcrypt will continue to be supported and will remain the default, but if you are starting a new project then it might be worth considering using the Argon2i driver once Laravel 5.6 officially makes it release.

Sunday, January 14, 2018

January 14, 2018

Laravel Model Caching


Laravel Model Caching


You’ve probably cached some model data in the controller before, but I am going to show you a Laravel model caching technique that’s a little more granular using Active Record models. This is a technique I originally learned about on RailsCasts.
Using a unique cache key on the model, you can cache properties and associations on your models that are automatically updated (and the cache invalidated) when the model (or associated model) is updated. A side benefit is that accessing the cached data is more portable than caching data in the controller, because it’s on the model instead of within a single controller method.
Here’s the gist of the technique:
Let’s say you have an Article model that has many Comment models. Given the following Laravel blade template, you might retrieve the comment count like so on your /article/:id route:
<h3>$article->comments->count() {{ str_plural('Comment', $article->comments->count())</h3>
You could cache the comment count in the controller, but the controller can get pretty ugly when you have multiple one-off queries and data you need to cache. Using the controller, accessing the cached data isn’t very portable either.
We can build a template that will only hit the database when the article is updated, and any code that has access to the model can grab the cached value:
<h3>$article->cached_comments_count {{ str_plural('Comment', $article->cached_comments_count)</h3>
Using a model accessor, we will cache the comment count based on the last time the article was updated.
So how do we update the article’s updated_at column when a new comment is added or removed?
Enter the touch method.

Touching Models

Using the model’s touch() method, we can update an article’s updated_at column:
$ php artisan tinker

>>> $article = \App\Article::first();
=> App\Article {#746
     id: 1,
     title: "Hello World",
     body: "The Body",
     created_at: "2018-01-11 05:16:51",
     updated_at: "2018-01-11 05:51:07",
   }
>>> $article->updated_at->timestamp
=> 1515649867
>>> $article->touch();
=> true
>>> $article->updated_at->timestamp
=> 1515650910
We can use the updated timestamp to invalidate a cache, but how can we touch the article’s updated_at field when we add or remove a comment?
It just so happens that Eloquent models have a property called $touches. Here’s what our comment model might look like:
<?php

namespace App;

use App\Article;
use Illuminate\Database\Eloquent\Model;

class Comment extends Model
{
    protected $guarded = [];

    protected $touches = ['article'];

    public function article()
    {
        return $this->belongsTo(Article::class);
    }
}
The $touches property is an array containing the association that will get “touched” when a comment is created, saved, or removed.

The Cached Attribute

Let’s go back to the $article->cached_comments_count accessor. The implementation might look like this on the App\Article model:
public function getCachedCommentsCountAttribute()
{
    return Cache::remember($this->cacheKey() . ':comments_count', 15, function () {
        return $this->comments->count();
    });
}
We are caching the model for fifteen minutes using a unique cacheKey() method and simply returning the comment count inside the closure.
Note that we could also use the Cache::rememberForever() method and rely on our caching mechanism’s garbage collection to remove stale keys. I’ve set a timer so that the cache will be hit most of the time, with a fresh cache every fifteen minutes.
The cacheKey() method needs to make the model unique, and invalidate the cache when the model is updated. Here’s my cacheKey implementation:
public function cacheKey()
{
    return sprintf(
        "%s/%s-%s",
        $this->getTable(),
        $this->getKey(),
        $this->updated_at->timestamp
    );
}
The example output for the model’s cacheKey() method might return the following string representation:
articles/1-1515650910
The key is the name of the table, the model id, and the current updated_attimestamp. Once we touch the model, the timestamp will be updated, and our model cache will be invalidated appropriately.
Here’s the Article model if full:
<?php

namespace App;

use App\Comment;
use Illuminate\Support\Facades\Cache;
use Illuminate\Database\Eloquent\Model;

class Article extends Model
{
    public function cacheKey()
    {
        return sprintf(
            "%s/%s-%s",
            $this->getTable(),
            $this->getKey(),
            $this->updated_at->timestamp
        );
    }

    public function comments()
    {
        return $this->hasMany(Comment::class);
    }

    public function getCachedCommentsCountAttribute()
    {
        return Cache::remember($this->cacheKey() . ':comments_count', 15, function () {
            return $this->comments->count();
        });
    }
}
And the associated Comment model:
<?php

namespace App;

use App\Article;
use Illuminate\Database\Eloquent\Model;

class Comment extends Model
{
    protected $guarded = [];

    protected $touches = ['article'];

    public function article()
    {
        return $this->belongsTo(Article::class);
    }
}

What’s Next?

I’ve shown you how to cache a simple comment count, but what about caching all the comments?
public function getCachedCommentsAttribute()
{
    return Cache::remember($this->cacheKey() . ':comments', 15, function () {
        return $this->comments;
    });
}
You might also choose to convert the comments to an array instead of serializing the models to only allow simple array access to the data on the frontend:
public function getCachedCommentsAttribute()
{
    return Cache::remember($this->cacheKey() . ':comments', 15, function () {
        return $this->comments->toArray();
    });
}
Lastly, I defined the cacheKey() method on the Article model, but you would want to define this method via a trait called something like ProvidesModelCacheKey that you can use on multiple models or define the method on a base model that all our models extend. You might even want to use a contract (interface) for models that implement a cacheKey() method.
I hope you’ve found this simple technique useful!